Android Studio 2.2 正式版发布后,更新内容中有提到对 C/C++ 支持的完善,表示非常高兴。然后将官网上这一部分内容翻译出来,如有错误,欢迎指正。
原文链接:Add C and C++ Code to Your Project
使用 Android studio,你可以将 C 和 C++ 代码编译成 native library(即 .so 文件),然后打包到你的 APK 中。你的 Java 代码可以通过 Java Native Interface(JNI)调用 native library 中的方法。如果你想了解更多的 JNI framework, 请阅读 JNI tips for Android.
Android Studio 默认使用 CMake 编译原生库。由于已经有大量的代码使用了 ndk-build 来编译 native code,所以 Android Studio 同样也支持 ndk build。如果你想导入一个 ndk-build 库到你的 Android Studio 项目中,请参阅后文的 关联本地库与 Gradle。然而,如果你创建了一个新的 native 库工程,你应该使用 CMake。
本篇文章将会说明如何使用 Android Studio 来创建、配置 Android 项目,以支持 native code,以及将其运行到你的 app 中。
注意:要在 Android Studio 中使用 CMake 或者 ndk-build,你需要使用 Android Studio 2.2 或更高的版本,同时需要配合使用 Android Plugin for Gradle 2.2.0 及以上的版本。
Attention experimental Gradle users: Consider migrating to plugin version 2.2.0 or higher, and using CMake or ndk-build to build your native libraries if any of the following apply to you: Your native project already uses CMake or ndk-build; you would rather use a stable version of the Gradle build system; or you want support for add-on tools, such as CCache. Otherwise, you can continue to use the experimental version of Gradle and the Android plugin.
下载 NDK 和构建工具
要编译和调试本地代码(native code),你需要下面的组件:
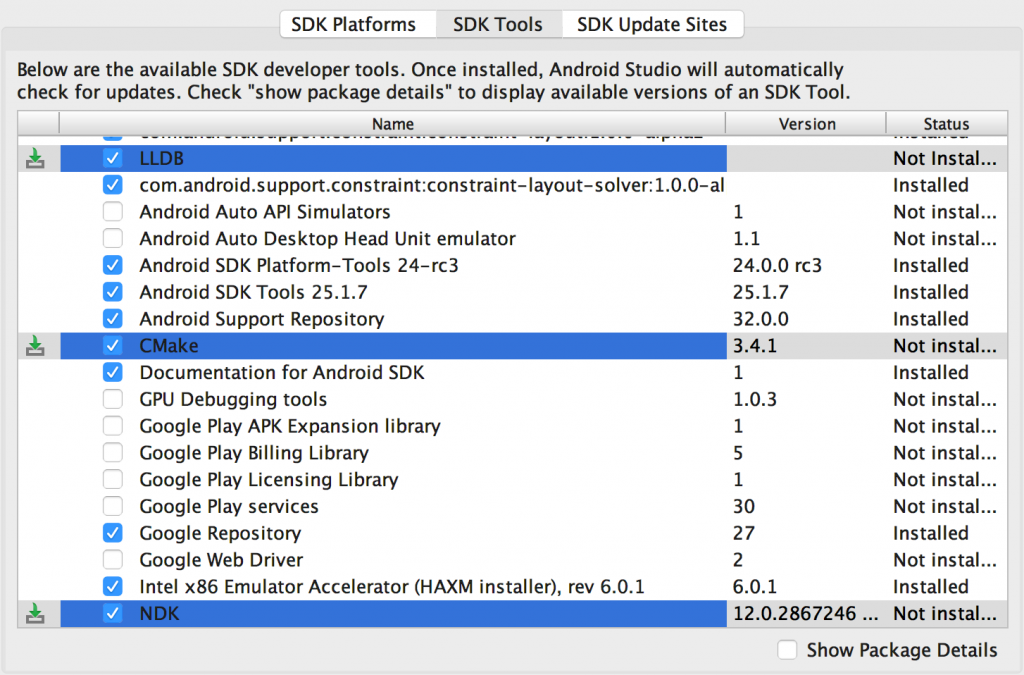
The Android Native Development Kit (NDK): 让你能在 Android 上面使用 C 和 C++ 代码的工具集。CMake: 外部构建工具。如果你准备只使用 ndk-build 的话,可以不使用它。LLDB: Android Studio 上面调试本地代码的工具。
你可以使用 SDK Manager 来安装上述组件:
- 打开一个项目,从菜单栏中选择 Tools > Android > SDK Manager。
- 点击 SDK Tools 选项卡。
- 勾选 LLDB,CMake 和 NDK。

- 点击 Apply,然后点击 OK。
- 当安装完成后,点击 Finish,然后点击 OK。
创建支持 C/C++ 的新项目
创建一个支持 native code 的项目和创建普通的 Android studio 工程很像。但是有几点需要留意的地方:
- 在 Configure your new project 选项中,勾选 Include C++ Support 选项。
- 点击 Next,后面的流程和创建普通的 Android studio 工程一样。
- 在 Customize C++ Support 选项卡中。你有下面几种方式来自定义你的项目:
- C++ Standard:点击下拉框,可以选择标准 C++,或者选择默认 CMake 设置的Toolchain Default 选项。
- Exceptions Support:如果你想使用有关 C++ 异常处理的支持,就勾选它。勾选之后,Android Studio 会在 module 层的 build.gradle 文件中的 cppFlags 中添加 -fexcetions 标志。
- Runtime Type Information Support:如果你想支持 RTTI,那么就勾选它。勾选之后,Android Studio 会在 module 层的 build.gradle 文件中的 cppFlags 中添加 -frtti 标志。
- 点击 “Finish”。
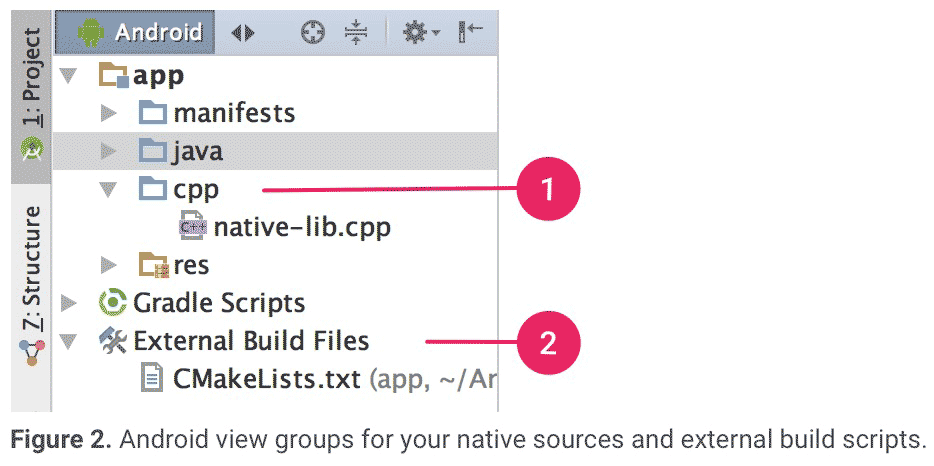
当 Android Studio 完成新项目创建后,打开 Project 面板,选择 Android 视图。Android Studio 会添加 cpp 和 External Build Files 目录。

- cpp 目录存放你所有 native code 的地方,包括源码,头文件,预编译项目等。对于新项目,Android Studio 创建了一个 C++ 模板文件:native-lib.cpp,并且将该文件放到了你的 app 模块的 src/main/cpp/ 目录下。这份模板代码提供了一个简答的 C++ 函数:
stringFromJNI(),该函数返回一个字符串:”Hello from C++”。 - External Build Files 目录是存放 CMake 或 ndk-build 构建脚本的地方。有点类似于 build.gradle 文件告诉 Gradle 如何编译你的 APP 一样,CMake 和 ndk-build 也需要一个脚本来告知如何编译你的 native library。对于一个新的项目,Android Studio 创建了一个 CMake 脚本:CMakeLists.txt,并且将其放到了你的 module 的根目录下。
编译运行示例 APP
当你点击 Run 按钮,Android Studio 会编译并启动一个 APP ,然后在 APP 中显示一段文字”Hello from C++”。从编译到运行示例 APP 的流程简单归纳如下:
- Gradle 调用外部构建脚本,也就是 CMakeLists.txt。
- CMake 会根据构建脚本的指令去编译一个 C++ 源文件,也就是
native-lib.cpp,并将编译后的产物扔进共享对象库中,并将其命名为 libnative-lib.so,然后 Gradle 将其打包到 APK 中。 - 在运行期间,APP 的 MainActivity 会调用
System.loadLibrary()方法,加载 native library。而这个库的原生函数,stringFromJNI(),就可以为 APP 所用了。 - MainActivity.onCreate() 方法会调用
stringFromJNI(),然后返回 “Hello from C++”,并更新 TextView 的显示。
注意:Instant Run 并不兼容使用了 native code 的项目。Android Studio 会自动禁止Instant Run 功能。
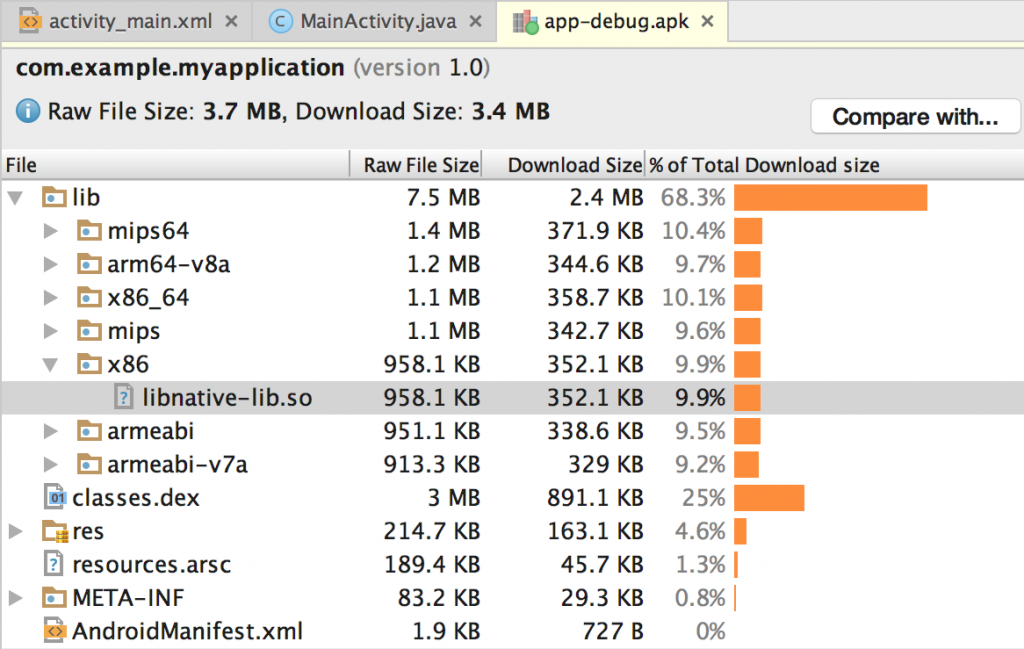
如果你想验证一下 Gradle 是否将 native library 打包进了 APK,你可以使用 APK Analyzer:
- 选择 Build > Analyze APK。
- 从
app/build/outputs/apk/路径中选择 APK,并点击 OK。 - 如下图,在 APK Analyzer 窗口中,选择
lib/<ABI>/,你就可以看见libnative-lib.so。

将 C/C++ 代码添加到现有的项目中
如果你想将 native code 添加到一个现有的项目中,请按照下面的步骤操作:
- 创建新的 native source 文件,并将其添加到你的 Android Studio 项目中。如果你已经有了 native code,也可以跳过这一步。
- 创建一个 CMake 构建脚本。如果你已经有了一个 CMakeLists.txt 构建脚本,或者你想使用 ndk-build 然后有一个 Android.mk 构建脚本,也可以跳过这一步。
- 将你的 native library 与 Gradle 关联起来。Gradle 使用构建脚本将源码导入到你的 Android Studio 项目中,并且将你的 native library (也就是 .so 文件)打包到 APK 中。
一旦你配置好了项目,你就可以在 Java 代码中,使用 JNI 框架开调用原生函数(native functions)。只需要点击 Run 按钮,就可以编译运行你的 APP 了。
创建新的 native source 文件
请按照下面的方法来创建一个 cpp/ 目录和源文件(native source files):
- 打开IDE左边的 Project 面板,选择 Project 视图。
- 找到你项目的 module > src 目录,右键点击 main 目录,选择 New > Directory。
- 输入目录的名字(比如 cpp),然后点击 OK。
- 右键点击刚才创建好的目录,选择 New > C/C++ Source File。
- 输入文件名,比如
native-lib。 - 在 Type 菜单下拉选项中,选择源文件的扩展后缀名,比如
.cpp。 - 如果你也想创建一个头文件,点击 Create an associated header 选项框。
- 点击 OK。
创建 CMake 构建脚本
如果没有一个 CMake 构建脚本,你需要自己手动创建一个,并添加一些合适的 CMake 命令。CMake 构建脚本是一个空白的文本文档(后缀为 .txt 的文件),名字必须为 CMakeLists.txt。
注意:如果你的项目使用了 ndk-build,你就不需要创建 CMake 构建脚本,只需要提供一个路径链,将你的 Android.mk 文件链接到 Gradle 中即可。
将一个空白的文本文档变成一个 CMake 构建脚本,你需要这么做:
- 打开 IDE 左边的 Project 面板,选择 Project 视图。
- 在你的 module 根目录下,右键,选择 New > File。(注意:构建任何你想要的位置。但,在配置构建脚本时,你的本地源文件路径和库是相对于构建脚本的位置。)
- 输入 “CMakeLists.txt” 作为文件名,并点击 OK。
现在,你可以添加 CMake 命令来配置你的构建脚本了。为了让 CMake 将源代码(native source code)编译成 native library。需要在编译文件中添加 cmake_minimum_required() 和 add_library() 命令:
1 2 3 4 5 6 7 8 9 10 11 12 13 14 15 16 17 18 19 20 |
# Sets the minimum version of CMake required to build your native library. # This ensures that a certain set of CMake features is available to # your build. cmake_minimum_required(VERSION 3.4.1) # Specifies a library name, specifies whether the library is STATIC or # SHARED, and provides relative paths to the source code. You can # define multiple libraries by adding multiple add.library() commands, # and CMake builds them for you. When you build your app, Gradle # automatically packages shared libraries with your APK. add_library( # Specifies the name of the library. native-lib # Sets the library as a shared library. SHARED # Provides a relative path to your source file(s). src/main/cpp/native-lib.cpp ) |
当你使用 add_library(),将一个源文件(source file)或库添加到你的 CMake 构建脚本,同步你的项目,然后你会发现 Android studio 将关联的头文件也显示了处理。然而,为了让 CMake 在编译时期能定位到你的头文件,你需要在 CMake 构建脚本中添加 include_directories() 命令,并指定头文件路径:
1 2 3 4 |
add_library(...) # Specifies a path to native header files. include_directories(src/main/cpp/include/) |
然后,按照约定,CMake 会将生成的 library 命名为下面的形式:
lib*library-name*.so
比如,如果你在构建脚本中,将 library 命名为 “native-lib”,那么 CMake 会创建叫 libnative-lib.so 的文件。但是,当你将 library 加载到 Java 代码中的时候, 你需要使用在 CMake 中指定的名称:
1 2 3 |
static { System.loadLibrary(“native-lib”); } |
注意:如果你将 CMake 脚本里面的 library 重命名了,或者移除了。你需要清理一下你的工程。在 IDE 的菜单栏中选择 Build > Clean Project。
Android Studio 会在 Project 面板中的 cpp 目录中自动添加源文件和头文件。你可以多次使用 add_library() 命令,来添加额外的 library。
添加 NDK APIs
Android NDK 提供了一些有用的 native APIs。将 NDK librarys 添加到 CMakeLists.txt 脚本文件中,就可以使用这些 API 了。
预编译的 NDK librarys 已经存在在 Android 平台中了,所以你不需要编译它们,或者是将其打包到你的 APK 中。因为这些 NDK librarys 已经是 CMake 搜索路径的一部分,你甚至不需要提供你本地安装的 NDK 路径。你只需要向 CMake 提供你想使用的 library 名字。
将 find_library() 命令添加到你的 CMake 构建脚本中,这样就可以定位 NDK library 的位置,并将其位置存储在一个变量之中。你可以在构建脚本的其他地方使用这个变量,来代指 NDK library。下面的示例代码将 Android-specific log support library 的位置存储到变量 log-lib中:
1 2 3 4 5 6 7 |
find_library( # Defines the name of the path variable that stores the # location of the NDK library. log-lib # Specifies the name of the NDK library that # CMake needs to locate. log ) |
NDK 同样也包含一些只包含源码的 library,这些就需要你去编译,然后链接到你的本地库(native library)。你可以在 CMake 构建脚本中使用 add_library() 命令将源码编译进本地库。这时就需要提供你的本地 NDK 安装路径,通常将该路径保存在 ANDROID_NDK 变量中,这样 Android Studio 可以自动为你识别。
下面的命令告诉 CMake 去构建 android_native_app_glue.c,这个命令可以管理NativeActivity 的生命周期以及点击输入,并将其导入静态库中,然后将其链接至 native-lib:
1 2 3 4 5 6 |
add_library( app-glue STATIC ${ANDROID_NDK}/sources/android/native_app_glue/android_native_app_glue.c ) # You need to link static libraries against your shared native library. target_link_libraries( native-lib app-glue ${log-lib} ) |
添加其他的预编译库
添加预编译库和添加本地库(native library)类似。由于预编译库是已经构建好的,你想就要使用IMPORTED 标志去告诉 CMake ,你只需要将其导入到你的项目中即可:
1 2 3 |
add_library( imported-lib SHARED IMPORTED ) |
然后你需要使用 set_target_properties() 命令去指定库的路径,就像下面的代码那样。
一些库会根据不同的 CPU 使用不同的包,或者是 Application Binary Interfaces(ABI),并且将他们归类到不同的目录中。这样做的好处是,可以充分发挥特定的 CPU 架构。你可以使用 ANDROID_ABI 路径变量,将多个 ABI 版本的库添加到你的 CMake 构建脚本中。这个变量使用了一些 NDK 默认支持的 ABI,以及一些需要手动配置到 Gradle 的 ABI,比如:
1 2 3 4 5 6 7 8 9 |
add_library(...) set_target_properties( # Specifies the target library. imported-lib # Specifies the parameter you want to define. PROPERTIES IMPORTED_LOCATION # Provides the path to the library you want to import. imported-lib/src/${ANDROID_ABI}/libimported-lib.so ) |
为了让 CMake 在编译时期能找到你的头文件,你需要使用 include_directories() 命令,并且将你的头文件地址传进去:
1
|
include_directories( imported-lib/include/ )
|
在 CMake 构建脚本中使用 target_link_libraries() 命令,将预构建库与你本地库相关联:
1
|
target_link_libraries( native-lib imported-lib app-glue ${log-lib} )
|
当你构建你的 APP 的时候,Gradle 会自动将导入的库打包到你的 APK 中。你可以使用 APK Analyzer 来检查。
关联本地库与 Gradle
为了将本地库与 Gradle 相关联,你需要在 CMake 或 ndk-build 构建脚本中提供一个路径地址。当你构建你的 APP 时,Gradle 会将 CMake 或 ndk-build 作为一个依赖运行,然后将共享库(.so 文件)打包到你的 APK 中。Gradle 同样使用构建脚本来识别哪些文件需要导入到 Android Studio 项目,你可以从 Project 窗口面板中看到相应的文件。如果你还没有一个为 native sources 准备的构建脚本,你需要先创建一个。
使用 Android Studio 图形化界面
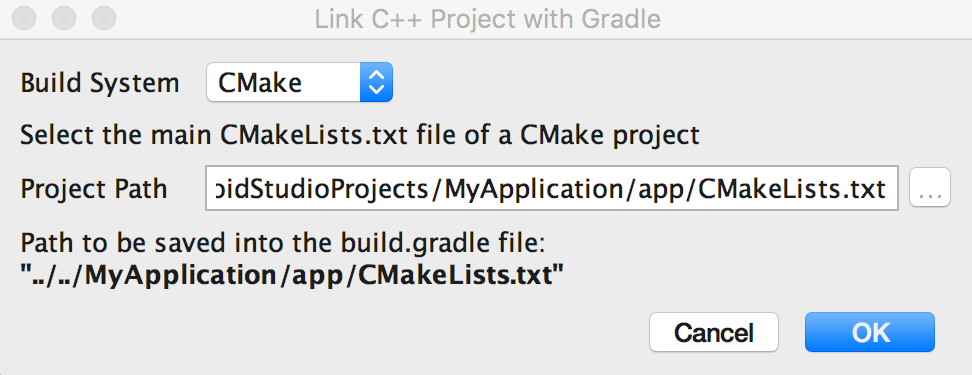
你可以使用 Android Studio 的图形化界面来将 Gradle 与外部 CMake 或者 ndk-build 项目关联起来。
- 打开 IDE 左边的 Project 面板,选择 Android 视图。
- 右键点击你想链接本地库的 module,比如 app module,然后从菜单中选择 Link C++ Project with Gradle。你应该能看见一个和下图很像的对话框。
- 在下拉菜单中,选择 CMake 或者 ndk-build。
a. 如果你选择 CMake,需要在 Project Path 中指定CMakeLists.txt脚本文件的路径。
b. 如果你选择 ndk-build,你需要在 Project Path 中指定Android.mk脚本文件的路径。

4.点击 OK。
手动配置 Gradle
如果要手动将 Gradle 与你的本地库相关联,你需要在 module 层级的 build.gradle 文件中添加 externalNativeBuild {} 代码块,并且在该代码块中配置 cmake {} 或 ndkBuild {}:
1 2 3 4 5 6 7 8 9 10 11 12 13 14 15 16 |
android { ... defaultConfig {...} buildTypes {...} // Encapsulates your external native build configurations. externalNativeBuild { // Encapsulates your CMake build configurations. cmake { // Provides a relative path to your CMake build script. path "CMakeLists.txt" } } } |
注意: 对于 NDK-Build 用户,使用ndkBuild {} ,在 Gradle 文件的部分中添加 *.mk 文件的路径。
可选配置
你可以在你的 module 层级的 build.gradle 文件中的 defaultConfig {} 代码块中,添加 externalNativeBuild {} 代码块,为 CMake 或 ndk-build 配置一些额外参数。当然,你也可以在你的构建配置中的其他每一个生产渠道重写这些属性。
比如,如果你的 CMake 或者 ndk-build 项目中定义了多个本地库,你想在某个生产渠道使用这些本地库中的几个,你就可以使用 targets 属性来构建和打包。下面的代码展示了一些你可能会用到的属性:
1 2 3 4 5 6 7 8 9 10 11 12 13 14 15 16 17 18 19 20 21 22 23 24 25 26 27 28 29 30 31 32 33 34 35 36 37 38 39 40 41 42 43 44 45 46 47 48 49 50 51 52 53 54 55 56 57 58 |
android { ... defaultConfig { ... // This block is different from the one you use to link Gradle // to your CMake or ndk-build script. externalNativeBuild { // For ndk-build, instead use ndkBuild {} cmake { // Passes optional arguments to CMake. arguments "-DCMAKE_VERBOSE_MAKEFILE=TRUE" // Sets optional flags for the C compiler. cFlags "-D_EXAMPLE_C_FLAG1", "-D_EXAMPLE_C_FLAG2" // Sets a flag to enable format macro constants for the C++ compiler. cppFlags "-D__STDC_FORMAT_MACROS" } } } buildTypes {...} productFlavors { ... demo { ... externalNativeBuild { cmake { ... // Specifies which native libraries to build and package for this // product flavor. If you don't configure this property, Gradle // builds and packages all shared object libraries that you define // in your CMake or ndk-build project. targets "native-lib-demo" } } } paid { ... externalNativeBuild { cmake { ... targets "native-lib-paid" } } } } // You use this block to link Gradle to your CMake or ndk-build script. externalNativeBuild { cmake {...} // or ndkBuild {...} } } |
指定 ABI
一般情况下,Gradle 会将你的本地库构建成 .so 文件,然后将其打包到你的 APK 中。如果你想 Gradle 构建并打包某个特定的 ABI 。你可以在你的 module 层级的 build.gradle 文件中使用 ndk.abiFilters 标签来指定他们:
1 2 3 4 5 6 7 8 9 10 11 12 13 14 15 16 17 18 19 |
android { ... defaultConfig { ... externalNativeBuild { cmake {...} // or ndkBuild {...} } ndk { // Specifies the ABI configurations of your native // libraries Gradle should build and package with your APK. abiFilters 'x86', 'x86_64', 'armeabi', 'armeabi-v7a', 'arm64-v8a' } } buildTypes {...} externalNativeBuild {...} } |
大多数情况,你只需要像上面的代码那样,在 ndk {} 代码块中指定 abiFilters 即可。如果你想控制 Gradle 构建、依赖你希望的东西,你就需要在 defaultConfig.externalNativeBuild.cmake {} 代码块或 defaultConfig.externalNativeBuild.ndkBuild {} 代码块中,配置其他的 abiFilters 标签。Gradle 会构建这些 ABI 配置,但是只会将 defaultConfig.ndk {} 代码块中指定的东西打包到 APk 中。
To further reduce the size of your APK, consider configuring ABI APK splits—instead of creating one large APK with the all versions of your native libraries, Gradle creates a separate APK for each ABI you want to support and only packages the files each ABI needs. If you configure an ABI split without specifying the abiFilters flag as shown in the code sample above, Gradle builds all supported ABI versions of your native libraries, but only packages those you specify in your ABI split configuration. To avoid building versions of your native libraries that you don't want, provide the same list of ABIs for both the abiFilters flag and your ABI split configuration.
文章评论
Th'ats going to make things a lot easier from here on out.